
Sew a Celebration Bunting! – Free Project by Karen
- inboxjunction
- Mar 18, 2015
- 4 min read
One of my nieces asked me to sew some bunting for her sister’s birthday present, to decorate her backyard for the summer. As always for me it’s choosing the fabrics and how to arrange them that takes a lot of the time, but she wanted red and white so that simplified matters! My fabric stash provided plain red, white spots on red and red and white gingham.

I like to make a matching storage bag with a hanging loop, in the hope the bunting will be folded up neatly and put back in the bag, rather than stuffed in a carrier bag and left so it needs ironing when you get it out again!

The bunting slots in and I tie the ends in a bow opposite the hanging loop. It makes a pretty gift. My niece said her sister was pleased with it anyway.

I’ve made bunting that says “Happy Birthday”, “Congratulations” and “Merry Christmas” all with matching bags.

I’ve even made Campervan Bunting! I leave the other side plain so if it’s hung against a wall it’s reversible, and of course it’s washable. I decided to make some Easter Bunting this year, so I thought I would share the process with you in a tutorial.

Materials I used –
Tape – 11.5 feet of 1 inch wide white twill tape . That’s 10 foot for the bunting and 2 x 9 inch ties.
Pennants/Bags – Stash of fabrics (plain and patterned in Spring colours), white thread, stiff interfacing
Applique – Fabric scraps, Bondaweb/WonderUnder, floss for hand-sewing and co-ordinating threads
How I made the Bunting –
1. Measure and decide how long a tape you need, plus ties.
2. Draft your pattern piece by making a triangle the size you want, and adding 1/4 inch seam allowances on the 2 long sides. This one is 8 inches wide and 10 inches long including seam allowances.
3. To decide how many pennants I need, I fold the twill tape in 4 sections (not including the ties) and arrange some along it until I am happy with the spacing. Multiply this number by 4 for the total and make a note of the space to leave between the pennants. I needed 8 pennants.
Working on a smaller scale like this helps when you only have a kitchen table to work on!
4. Cut two triangles for each pennant. Add applique design to the front piece (optional). Sew them right sides together with a 1/4 inch seam down both long sides, leaving the top open. I leave the top edges raw, as they are enclosed inside the tape.
5. Press, and trim around point to reduce bulk. Turn right side out, and use a chopstick or similar to push the point out.
6. Press again, especially the seams, and trim off the two triangles of seam allowance that stick out of the top edge so it is even. Repeat this process until all your pennants are ready.

7. Fold under 1/4″ on the raw ends of the tape and stitch down to neaten.
8. Fold the tape in half lengthways and press. Mark the centre, and where your ties will begin, with a temporary marker.
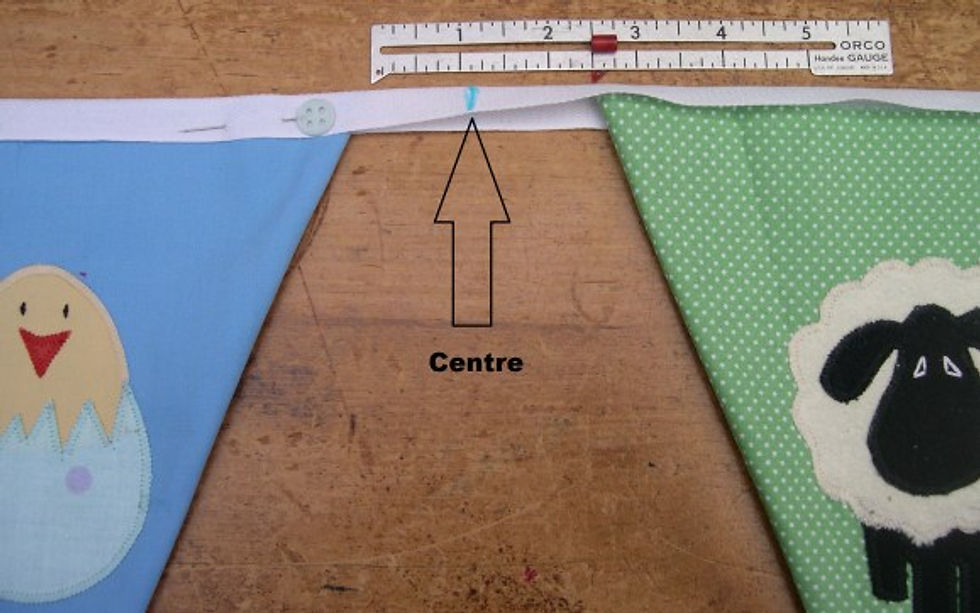
9. Starting in the centre and moving outwards, space the pennants evenly under the fold, between the centre and end marks. Pin in place. As you can see I spaced these 2 1/2 inches apart. They should finish approximately on the marks where the ties begin!

10. Stitch twill tape from one end to the other, on mine I line up the right side of the tape with the right side of the foot and that is about 1/8 inch in from the left edge! Make sure you catch the tape on both sides. You may like to make a loop at either end for hanging, by turning the tape back 2 inches and stitching it down.

Easter Bunting

In case you wanted to know, here is how to make the bunny tails. Wrap white wool around an old wooden coathanger (or your finger) and tie the ends. Slip it off and tie it around the middle. Snip through the loops at each end, squash it down so the middle tie is hidden and stitch it in place.
How I make a Bunting Bag

1. Draft your pattern piece by adding 1/2 inch on each long side of the pennant pattern, and cutting 1 inch off the point (the top is straight, it’s just my cardboard is curling up!).
2. Cut 2 triangles from outer fabric and 2 from stiff interfacing and apply it to the wrong side of the fabric. I prefer to use fusible (I used Vilene S120.
3. Add your applique decoration (optional)

4. Measure enough 1 inch tape to go around the top of the bag and add an inch and cut. Cut another piece 5 inches long for loop.
5. Sew the 2 triangles right sides together with a 1/4″ seam. Trim around point. Turn right side out, press well as it gets a bit crumpled! Press the seams open and flat for the top inch or so.

6. Fold the 5 inch piece in half lengthways, press. Stitch close to the edge. Fold in half and position inside bag, loop down, centred over a side seam, with the raw ends matching the edge of the bag. Stitch in place 1/4 inch from edge and trim in line with the bag top.
7. Fold the other tape in half lengthways and press. Fit over the edge of the bag, so the raw ends overlap at the seam and pin in place.

8. Mark the seam line on both tapes, remove. Stitch the ends together on the marks, press and trim.

9. Fit binding to bag edge, matching the seam to the seam with the hanging loop, and easing the binding over the other side seam. Pin and stitch close to the edge.

10. Then fold the hanging loop up and stitch in place. Done, just insert your bunting with the tied ends opposite the hanging loop.
This is not the only way to do it, it is just the the way I have developed to avoid having frayed tape ends inside. You can make yours any way you like!
Easter Bunting Bags!
Advertisement


Comments